Introduction
With Prolific’s API, you can:
- Recruit Participants: Quickly source and filter for the right participants.
- Manage Studies: Create, update, and publish studies directly from your app.
- Automate Workflows: Approve submissions, process bonuses, and send messages programmatically.
- Leverage Advanced Features: With our API you can integrate Taskflow for A/B testing, AI Task Builder to annotate your model-training data, and strengthen your integration with our Webhooks as well as configure complex study settings.
With this guide, you’ll learn how to integrate with Prolific’s REST API to recruit high-quality participants and manage your research workflows programmatically.
This article will take you from generating an API token through to making your first API request, and will be broken down step by step. Even if you’re new to REST APIs, you should be able to follow along with this article to get started.
Contents
About Requests to the Prolific API
Authentication and API Tokens
Understanding our Endpoints
Making Your First API Request
About Requests to the Prolific API
Every API request to Prolific follows a standard REST structure that includes:
- HTTP Method: Specifies the action (e.g., GET, POST, PATCH, DELETE).
- Endpoint Path: The URL path to a resource (e.g.,
/api/v1/studies/). - Headers: Provide additional information for your request, such as content type and your API token.
- Optional Parameters: Additional details sent via:
- Query Parameters: Accesses a specific resource or filters the request.
- Body Parameters: Data payload for creating or updating resources (Provided in JSON format)
Note: All requests are sent to the base URL:https://api.prolific.com/api/
Authentication and API Tokens
Generating an API Token
Before making requests with the Prolific API, you need to generate an API token. To do this:
- Log into your Prolific Researcher Account
- Navigate to API Tokens: Find this page in your sidebar, or visit this link.
- Generate your Token: Click 'Create API Token', give it a name, and voilà! You've just created your first token.
For more detailed instructions, please see Managing Your API Token.
Best Practices for API Token Security
- Server-Side Usage Only: Never use API tokens in client-side code (e.g., JavaScript in web browsers). Doing so could expose your token publicly.
- Access Controls: Regularly review token usage and rotate your tokens as required.
- Environment Variables: Store tokens in secure configuration files or environment variables rather than hardcoding them.
Important: Prolific API tokens do not expire. Please handle them with care to ensure your account is secure.
Understanding our Endpoints
Our API follows the standard REST approach. Here's a quick overview of how our endpoints are structured:
Entry Point and Versioning:
Each endpoint has an entry point and will be versioned:
- Entry Point: All API requests start with the base entry point: https://api.prolific.com/api/
- Versioned Endpoint: To ensure backward compatibility, all endpoints are versioned: https://api.prolific.com/api/v1/
Collection and Element URLs
Each resource is represented by two types of URLs:
- Collection URL: Used to interact with a collection of resources (e.g., list or create).
- Example:
https://api.prolific.com/api/v1/studies
- Example:
- Element URL: Used to interact with a specific resource (e.g., update or delete).
- Example:
https://api.prolific.com/api/v1/studies/{id}/ - Replace
{id}with the ID of the resource you want to access.
- Example:
Request Methods
The Prolific API supports the following HTTP methods:
GET:Retrieve data about a resource.
Example: Fetch a list of studies or details of a specific study.POST:Create a new resource.
Example: Create a draft study.PATCH:Update specific fields of an existing resource.
Example: Update the description of a study.DELETE:Remove a resource.
Example: Delete a study or participant submission.
Path Parameters
Some endpoints require path parameters to specify the resource being accessed. For example: https://api.prolific.com/api/v1/studies/{id}/
In this case, {id} must be replaced with the unique Study ID.
Example: To access a study with the ID 60d9aadeb86739de712faee0 via the API, the URL would be: https://api.prolific.com/api/v1/studies/60d9aadeb86739de712faee0/Documentation
The Prolific API documentation provides detailed information for each endpoint, including:
- Required HTTP methods
- Full endpoint URL
- Mandatory and optional parameters
- Example requests and responses
Here's an example of our Create a draft study endpoint:
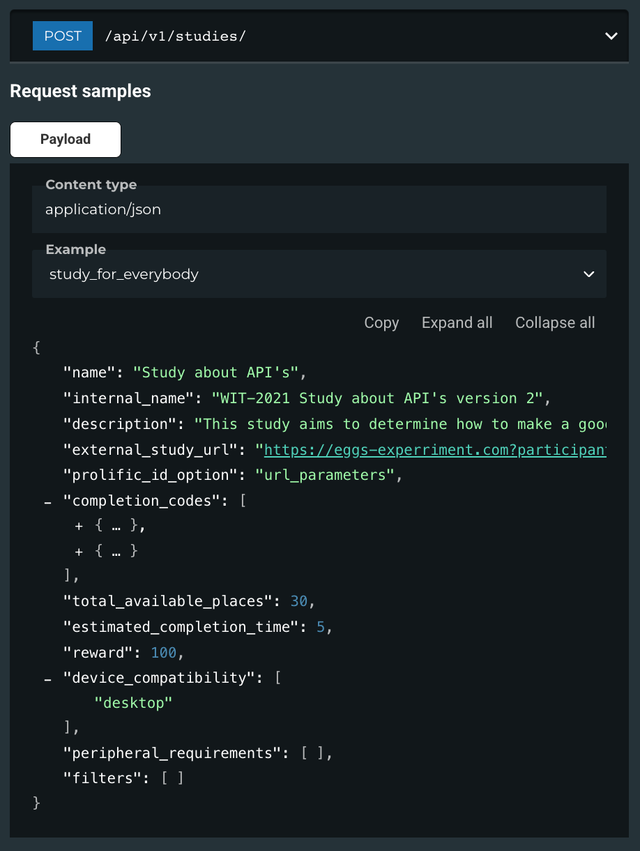
Note: If you would like to access more information about a specific endpoint and the required parameters, please visit our API documents.
Making Your First API Request
Once you've set up your API token and are familiar with our API structure, you're ready to make your first request. You can either use the REST API directly with a HTTP client of your choice, or this guide will walk you through making an API request using the Requests library in Python.
For a full list of available endpoints, please refer to our API Documentation.
Creating your Request
Once you have your API token and understand the structure, you can begin making requests. Let’s create a draft study using the /studies/ endpoint.
Choose your Endpoint
In this example, we'll create a draft study with this endpoint: https://api.prolific.com/api/v1/studies/
Initialize your Request
To set up our request, we need to import the required libraries and specify our endpoint URL:
import requests
import json

url = "https://api.prolific.com/api/v1/studies/"
Set Up Headers and Payload
Headers:
To authenticate our request, we need to include an 'Authorization' header. We should also specify a content-type, so the Prolific API knows what type of data we're sending:
headers = {
  "Content-Type": "application/json",
  "Authorization": "Token YOUR_TOKEN_HERE"
}
Note: Please replace YOUR_TOKEN_HERE with your token.Payload:
When creating a resource, we need to include the required parameters in the request payload. For the /studies/ endpoint, the required parameters include:
- name: The study’s title.
- description: A brief description of the study.
- external_study_url: The URL participants will access.
- reward: The reward for participants (in cents/pence).
- total_available_places: Number of participants required.
- prolific_id_option: How Prolific IDs are provided (e.g., "question").
- completion_codes: Codes used to track study completion.
- estimated_completion_time: Estimated time (in minutes) to complete the study.
Let's build our payload with the required data:
payload = json.dumps(
{
  "name": "My First API Request",
  "description": "This is a Study",
  "external_study_url": "https://www.prolific.com/",
  "reward": 10,
  "total_available_places": 1,
  "prolific_id_option": "question",
  "completion_codes": [
    {
      "code": "ABC123",
      "code_type": "COMPLETED",
      "actions": [
        {
          "action": "MANUALLY_REVIEW"
        }
      ]
    }
  ],
  "estimated_completion_time": 1
})
Send the Request and Receive the Response
With everything set up, we can now make the request using the appropriate HTTP method. As we're creating a draft study, we’ll use the POST method. After sending the request, we’ll print the API’s response to verify that everything worked as expected:
response = requests.request("POST", url, headers=headers, data=payload)

print(response.text)
Full Request Example
Now that we've walked through setting up the endpoint, payload, headers, and method, here’s the full request:
import requests
import json

url = "https://api.prolific.com/api/v1/studies/"

headers = {
    "Content-Type": "application/json",
    "Authorization": "Token YOUR_TOKEN_HERE"
}

payload = json.dumps(
{
  "name": "My First API Request",
  "description": "This is a Study",
  "external_study_url": "https://www.prolific.com/",
  "reward": 10,
  "total_available_places": 1,
  "prolific_id_option": "question",
  "completion_codes": [
    {
      "code": "ABC123",
      "code_type": "COMPLETED",
      "actions": [
        {
          "action": "MANUALLY_REVIEW"
        }
      ]
    }
  ],
  "estimated_completion_time": 1
})

response = requests.request("POST", url, headers=headers, data=payload)

print(response.text)
API Response
Once your request is sent, the API will return a response. This response will include information about the outcome of your request, including details of the created resource (in this case, a Study), and any related error messages if something went wrong.
Here’s an example of what a typical successful response might look like:
{
  "id": "67c706669bb10cd38e484f1a",
  "name": "My First API Request",
  "description": "This is a Study",
  "external_study_url": "https://www.prolific.com/",
  "prolific_id_option": "question",
  "completion_codes": [
    {
      "code": "ABC123",
      "code_type": "COMPLETED",
      "actions": [
        {
          "action": "MANUALLY_REVIEW"
        }
      ]
    }
  ],
  "total_available_places": 1,
  "estimated_completion_time": 1,
  "maximum_allowed_time": 1,
  "reward": 10
  "status": "UNPUBLISHED"
}
You can then use the response data to verify that the request was successful, and debug any issues by analyzing the error message and status code provided.
Please let us know if you have suggestions, questions, or feedback by getting in touch.